Growing Auto Flower Cannabis Organically
What you will need:
Seed of your favorite strain
1 Gallon pots that will break down in soil ( AC Infinity has some really good ones)
Mix of the Perfect Organic Soil
Water (of course)
2 Makeup cotton round pads ( circle ones in tube) you can find them in the cosmetic section of your favorite store usually about 1-2 dollars
zip lock bag
Small cup
5 gallon fabric pot
grow light ( I personally use a florescent for starting seeds and Viparspectra p1000 (2x2) and p2000 (2x4) )
Optional: Fan, Pocket Microscope.
WARNING: I only provide information for those who are legal areas and are able to grow in accordance with local laws.
This is a very simple grow for people who are just getting into growing cannabis, there are more advanced ways and other modifications that can be made to improve the grow: Temps, Humidity, VPD level, CO2 so on and so forth I plan on making a future How To discuss these more advanced techniques, but this is the basics of growing.
Week 0 :
put a little water in a small cup place seed in the water (just enough water for it to float) and place in a dark warm area and wait 8-12hrs. (this helps to break down the membrane on the outer shell, so it pops faster)
After 8-12hrs take your cotton rounds and moisten them with water lightly until they are moist but not soaked place the seed in the cotton round sandwiching it together loosely and place in the zip lock bag leave it unzip 1/4 of the way where air can still get to it and leave in a warm dark place ( you can place a towel over it and place it on top of your fridge) the goal is to keep it at 75-80 degrees this is optimal germination temp for cannabis seeds and wait 24hrs.
After 24hrs check your seed to see if you see root tail coming out of the seed if so proceed to the next step.
Take your 1-gallon pot and fill till about 1/2inch to 1 inch to the top and make a hole in the center about 1/4 of inch deep and place seed in with the tail sticking down if your having trouble its ok it will self-right itself. Cover with soil and place under a grow light depending on the strength and type you have (I use a florescent for starting seeds) and place the light about 1-2 inches away from the top and set the light to 18hr cycle.
moisten soil where seed was placed (lightly spray it just enough to moisten but not soak the soil)
continue to moisten soil as you see it dry out it only takes about half a shot glass normally.
Week 1 :

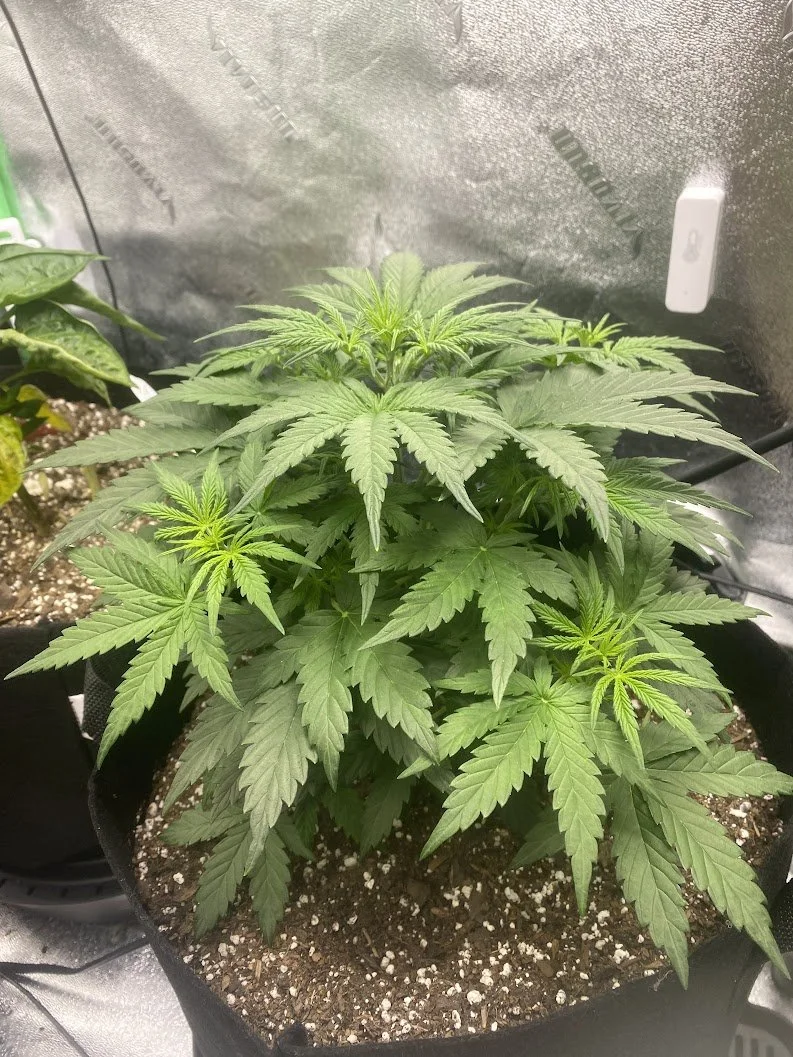
Should now have a small seedling it is very fragile at this point in its life once the plant gets 2 sets of true leaves it will be considered in its Veg cycle and ready to be placed under more powerful lights ( I personally use a p1000 for a single plant in my 2x2 so I will use this for this example please use the settings your light has and recommendations on intensity) Set the light to 50% intensity and place it 2ft above the plant.
Continue to keep plant moist during this time you can now give it about 1-2 cups of water keeping the 1 gallon container moist or if your able to use a tray you can start bottom watering allowing the container to soak the water as needed.
Move your light as needed to keep it 2ft above the plant it should start taking off now putting on more and more true leaves.
Week 2:

Your plant is on its way to becoming some fire bud :) but it still needs lots of help at week 2 its time to give it some more nutrients using the 4-4-4 nutrients from the Perfect Organix Mix add about 1-2 tablespoons to the top of the soil around the plant and scrap it into the top inch of soil careful not to disturb the leaves or roots too much.
Water in the mix really well with 1-2 cups water
Continue to water as needed keeping the soil moist around the plant every couple of days as it drys out.
Week 3:

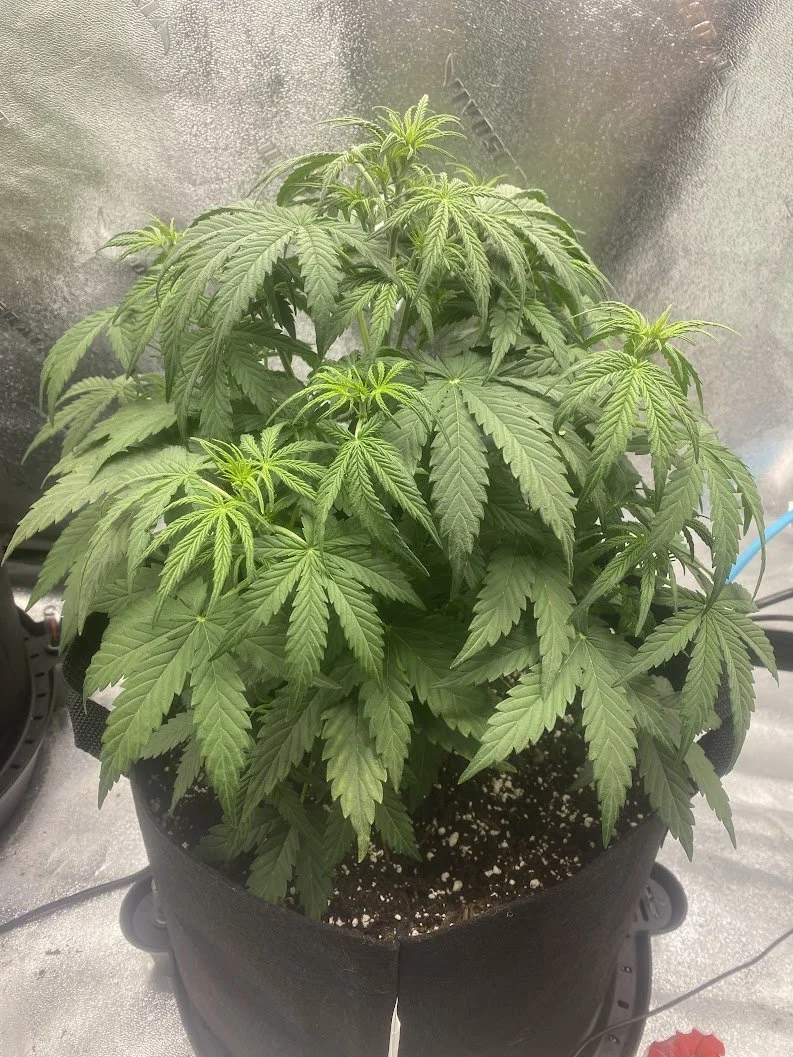
Your plant should starting looking pretty big This is a good time to do small trims taking off any big fan leaves (1-3 at a time) covering bud sites if you are starting to see them. you will only want to do this once a week or so as to not disturb the growth of the plant auto flowers are especially picky about this and can stunt your plant if you do too much.
Continue to water the plant as needed keeping soil moist but not soaked.
We can also increase our light intensity to from 50% to 75% keeping it 2ft away from the plant leaves adjusting as needed.
Check the bottom of the pot to see if roots are starting to grow through the pot if so continue to step 4 if not come back to this step the following week.
ONLY PROCEED IF YOU SEE ROOTS GROWING ON THE BOTTOM OR AT WEEK 4: Grab the 5 Gallon fabric pot and add in the Perfect Organic mix covering about 1/4 to 1/3 of the bottom leave enough room for the 1 gallon pot to sit on top and be over the side of the 5 gallon pot.
gently place the entire pot inside (remember these bags are bio degradable and roots grow right through them) fill the rest of the way up with soil around the pot filling it all the holes and covering the top leaving about 1/2inch to 1 inch of the top of the pot exposed.
water it in really well at this point it should take 1/2 gallon of water to 1 gallon of water.
continue to water as needed you shouldn’t have to water as much now as its a bigger container as easy to check is by inserting your finger into the top of soil about an inch and checking if soil is moist also pot should not be super light.
Week 4:
This is pre-flower stage you should start seeing bud sites from again try and keep trimming down to minimum also try tucking the fan leaves where you can under the bud sites so that they get plenty of light.
Check back to week 3 step 5 at this point whether you see roots or not and follow the steps mentioned.
from this point on we will be switching our fertilizer from 4-4-4 to a 4-6-2 All-purpose mix from Down to earth since it has been 2 weeks since our last top feed we will go ahead and top dress these plants with 2-3 tbs of around the top of the soil same as we did before mixing it 1 inch into the soil with our hands (it helps if the soil is dry during this process so it mixes better) and water it in with 1/2 gallon to 1 gallon of water.
Continue to water as needed at this point.
Week 5:
We have reached full on flowering at this point at you should start to see trichome development ( small white dots on the some of the leaves around the bud and on the buds themselves) You may also start to smell the different aromas depending on the terpenes your plants have (fun fact: not all cannabis plants smell like skunk but alot of strains do I once had a strain smell like warm lemon pie fresh from the oven imagine smelling that every day it was so wonderful).
Not a lot to do this week continue tucking leaves and keeping soil moist if you have a fan now would be a good time to blow it around the plant (not on) to keep moisture off the leaves and away from bud sites to prevent mold.
Week 6:
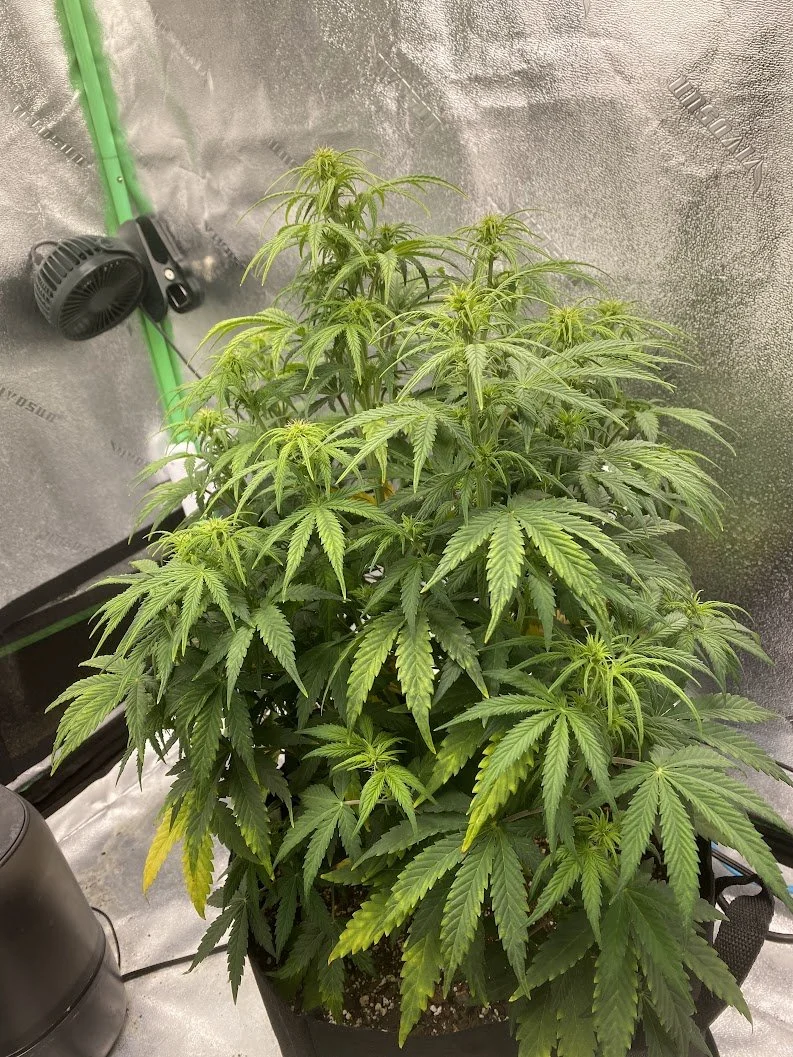
If you wernt’t smelling it before you really should be now the budsites should be starting to get bigger.
You should start seeing a uptake of water at this point and now is a good time to top feed again this should be our last time to top feed with the 4-6-2 mix same as before in week 4.
Continue to water as needed keeping soil nice and moist and fans blowing around the plant to prevent mold if you have them.
Week 7:

This is the 2nd half of our flower stage bud development will reach peak during these last few weeks and we are starting our “flush” we will not be giving it any more nutrients as the soil has everything it needs to last the next few weeks. ( fun fact: When growing organically there is really no need to “flush” just stop giving soil nutrients it only takes what it needs to survive where as with synthetic nutrients the last few weeks you have to stop providing it synthetic nutrients since your force feeding and even flushing with a lot of water to get all the nitrogen out of the soil in order to have really good tasting bud)
Continue to water as needed keeping soil moist
you will notice yellowing fan leaves at the bottom of the plant this is a good sign that plant is reaching maturity go ahead remove any and all yellow leaves that have died.
Week 8:
Before fans leaves were stripped
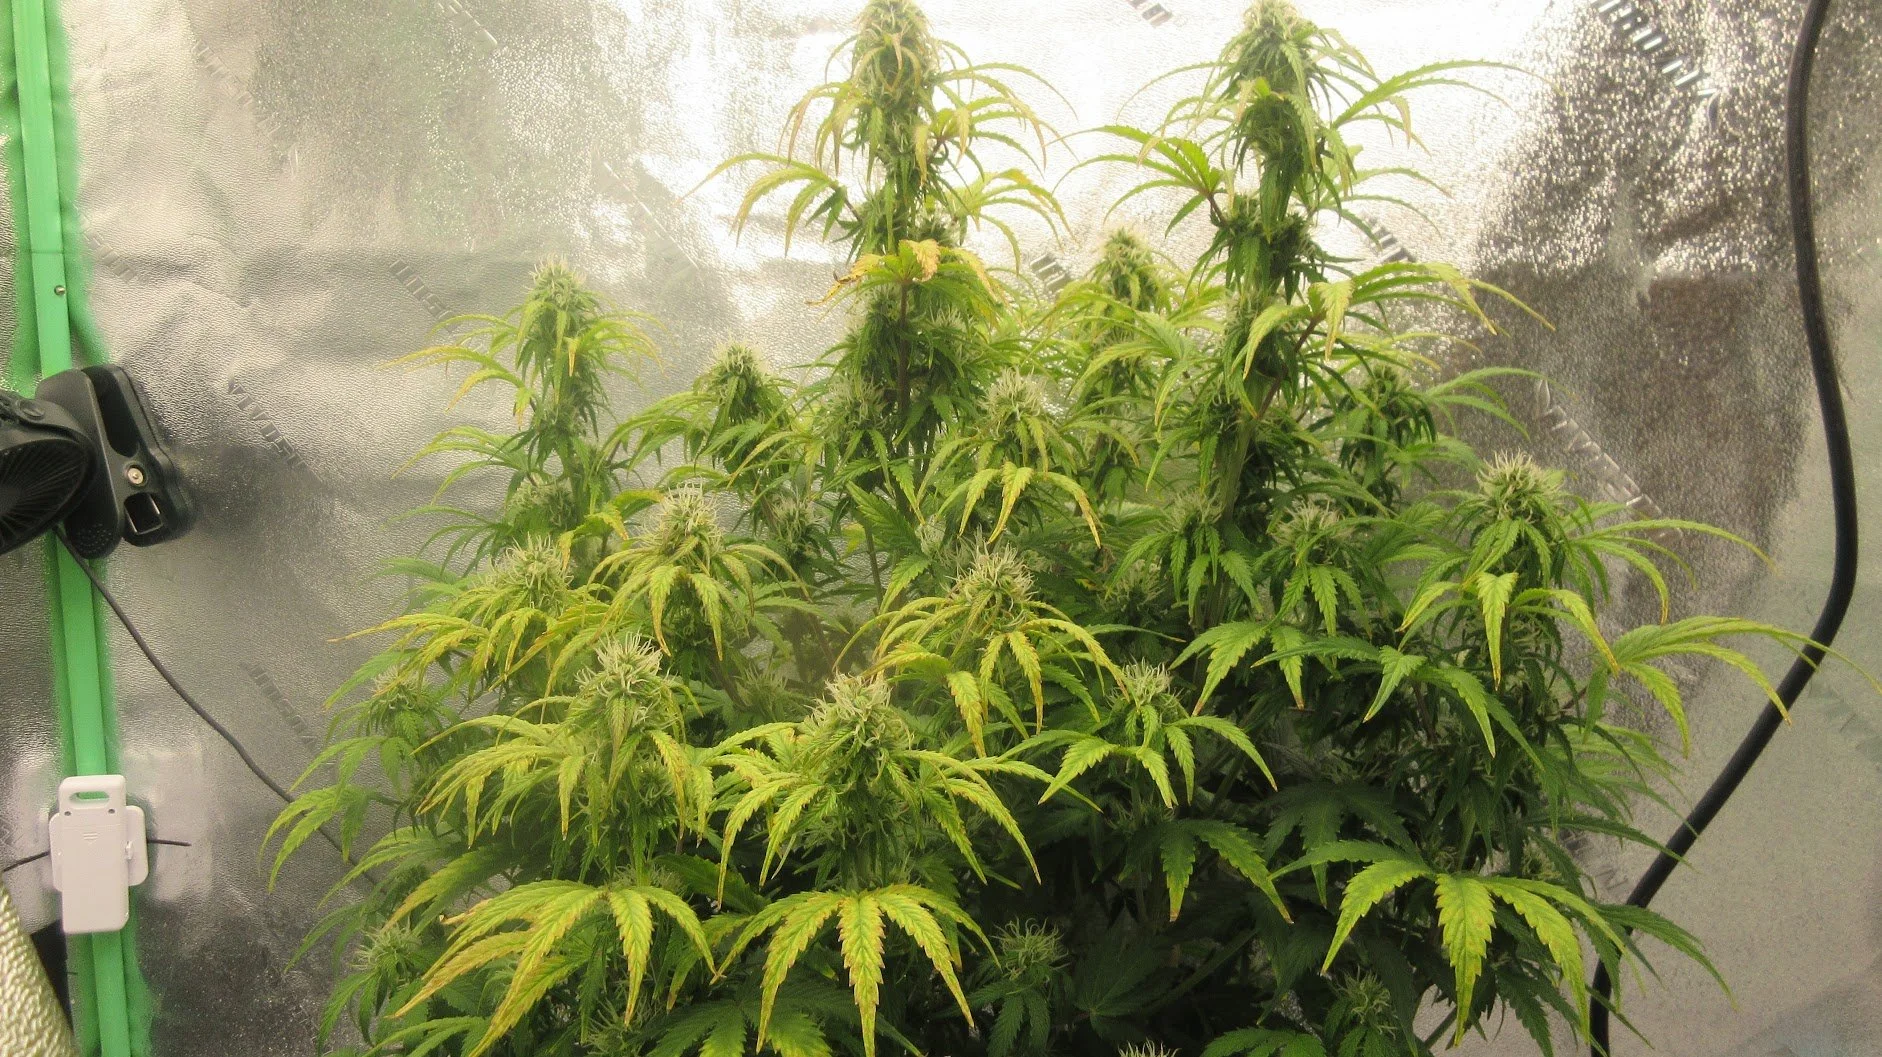
Budsites should be reaching peak maturity remember how said don’t take but 1-3 fan leaves a week around budsites…. this is the week to say goodbye to fan leaves strip the plant of all the fan leaves leaving only the sugar leaves (closest ones to the bud with white trichomes covering them) this will divert all the energy into the budsites allowing them reach there full growth.
continue to water the plant as needed keeping soil moist
Week 9:

Didn’t have a final picture of my white-widow but this is my Queen of Hearts and your should look like this above.
The bud sites should have reached full maturity at this point if you have a jewelers lense or a small pocket microscope would be a good time to look at the trichomes the hairs around the budsites should be amber at this point and trchomes should be about 10-20% amber and rest cloudy white very little to none should be clear at this point.
If the trichomes are not amber continue to water as needed keeping soil moist wait 2 more days and check again.
Once the Trichomes are 10-20% amber its time to reap your reward you can now Harvest and dry your buds your preferred way. YAY !!